Friday, February 23, 2024

Maximo Automation Scripts - Part 3 – Attribute Launch Point

In the last blog we discussed in detail the object launch points. In this blog we will talk about attribute launch points. Attribute launch point is created when we need to trigger an event (validation/action) as 
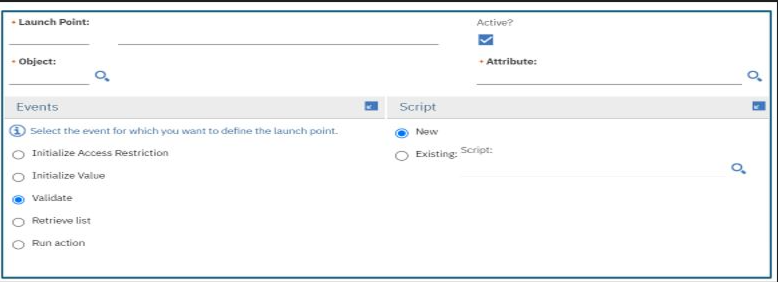
soon as the value for the attribute is modified. Below screenshot shows various events available on attribute launch point which we will be discussing in detail here.


Launch Point: Name of the launch point and description.

Object: Name of the object.

Attribute: Provide the name of the attribute on which the script needs to be triggered.

There are two sections visible while creating a new attribute launch point: Events and Script.

Under Events we have:

  • Initialize Access Restriction: This method is used when we need to make fields required or read-only as soon as the record is opened/initialized. For example, you may want to make location field on asset application read-only as soon as the asset record is opened when asset status is OPERATING. This event should be strictly used to make fields required/read-only and no other complex business logic should be written as it may impact the performance of the application. This event is the same as init() method in java class.
  • Initialize Value: This event is used when we want to initialize the values of attributes as soon as the record is opened/initialized. An example would be, setting the value of location field on ASSET object to say “ABC” as soon as the asset record is opened. Just like Initialize Access Restriction, use this event only to initialize the values of the fields and no business logic should be introduced here. This event is the same as initValue() method in java class.
  • Validate: This event is same as validate() method in java class. This event is used when you have to validate data on the current object or related objects before it is processed. For example, while entering the value of location field on ASSET record you want to validate that the location is OPERATING. If not, you can throw an error.
  • Retrieve List: If there is a need to display a dynamic list of values based on certain conditions, retrieve list event can be used. For example, display only OPERATING locations in the location lookup in asset application if the asset status is ACTIVE but if the asset status is not ACTIVE display all types of locations in the lookup. To achieve this, we need to create a table domain in Maximo with object selected as LOCATIONS. Keep the list where clause blank in the table domain. In the automation script we can check for the conditions above and set a dynamic where clause like below:


                    You can also order the list of values using listOrder like, listOrder=”LOCATION”. This event is the same as getList() method in java class.
  • Run Action: This event is same as action() method in the java class. It is used to perform actions (setting the values of one field based on another field, adding new mbosets, throwing errors etc.) when the field value is updated. 

Under Script we have same options as I have already discussed in my earlier blog.


Saturday, February 17, 2024

Maximo Automation Scripts Object Launch point - Part 2

In my earlier blog I have explained in brief about MBO/Object Launch point scripts. These scripts are created when we must perform validations/actions when the object is initialized/created/updated/deleted. Below screenshot shows various events available on object launch point which we will be discussing in detail in this blog.


Launch Point: Provide the name of the launch point and description.

Object: Provide the name of the object on which the script needs to be written (WORKORDER, ASSET etc.).

Object Event Condition: Object event condition is used when you want to filter the records first using a condition (e.g. status==”APPR”) and then execute the code only on that filtered set. This is very useful for performance improvement as the number of records to be processed are filtered even before the code is executed.

There are three sections visible while creating a new object launch point: Events, Save and Script. 

Under Events we have:

  • Initialize Value: Whenever a record is opened (work order, assets etc.)/object is initialized in Maximo, this event will be triggered. With this event we can initialize the values of fields displayed on the record. This event should strictly be used for this purpose only and no other complex business logic/validations should be written in this event as it will create performance issues in the application. This event is same as init() method in the java class.
  • Validate Application: This event is used when mbo needs to be validated against certain business rules and before saving it. For example, validate if a location is entered on SR before it is allowed to be saved. This event is same as appValidate() method in java class.
  • Allow Object Creation: If you want to make certain validations before creating the object, you can do so in this event. As an example, you don’t want users to add anymore PRLINE if the PR is approved. You can write this logic on PRLINE object and check if the associated PR is APPR or not. If PR is in APPR status, you can throw an error. This event is same as canAdd() method in java class.
  • Allow Object Deletion: With this event, you can stop an object from being deleted until certain validations are passed. For example, do not allow to delete an asset (though we do not delete asset ideally and just decommission it) if it has open work orders associated with it. You can throw an error in the script if the validations do not pass. This event is same as canDelete() method in java class.
  • Save: This event is same as save() method in java class. This event can be used when you want to perform any validations/actions when the record is being saved. Save is called from lot of places like, from user interface when we click on save button, can be called when external system is sending requests to Maximo to update objects, can be called from automation scripts/java classes etc. As soon as we select Save option, options under Save section are enabled.

      Under Events we have:

  • Add: This event is called when a new record/object is being created. This is same as toBeAdded () method in java class. For example, when a new record is created, you may want to create another child record and save it along with parent record.
  • Update: As the name suggests, it is triggered when a record is being updated. As an example, you may want to validate certain field values if they are correctly filled in (or not empty), you may want to check the data in other related tables (if related tables have all the information captured) before saving the record. This is same as toBeUpdated() method in java class.
  • Delete: This event is triggered when a record is being deleted. As an example, when a parent record is deleted, you may want to delete all its child records. This event is same as toBeDeleted() method in java class.
  • Before Save: In this event insert/update/delete sql’s are yet to be fired. Such an event can be used in scenarios such as, you want to validate if the WONUM field on the work order follows certain naming convention. If not, throw an error message.
  • After Save: In this event insert/update/delete sql’s are fired but database commit is yet to happen. This event can be used where we must perform certain transactions but if the transactions fail, rollback the transaction since commit has not happened yet. For example, sending a record to an external system through integration. But if sending the record fails due to certain issues, rollback the entire transaction from source (Maximo) system as well.
  • After Commit: In this event, database commit is done post insert/delete/update sql’s are fired. That means the transaction is saved in the database. Such an event can be used when we want to perform an action only when all the Maximo level validations are passed, and the data is committed in the DB. Sending notifications to the users only after a PO is received, is an example where we can use this event.
Under Script we have:
  • New: This radio button is checked when we are creating a new script. By default, this button is selected.
  • Existing: Check this radio button if you want to add this script as a part of an existing script. You can select the existing script name using the script option specified next to the radio button. This will add this script as a launch point in the existing script. As an example, you may have a common code that you want to run from multiple places. You can create a single script and add the common logic in the script. You can then create multiple launch points as per your requirement (from where you want to execute the common code) using “Existing” radio button and select the common script that is created using the lookup next to the radio button.
        In the next blog we will discuss attribute launch point in detail. Happy learning!

Friday, February 9, 2024

Maximo Automation Scripts – Intro: Part 1

 Maximo automation script was introduced for the first time in version 7.5. Since then, it has evolved big time and is now one of the most powerful and commonly used applications by the developers for most of the development.

Scripts are a kind of replacement for java classes. Before Maximo 7.5, developers had only one choice of writing java classes to customize the product functionality. With java classes, there were some pros and cons such as skill set, server downtime etc. IBM has done a great job in revolutionizing automation scripts over the past few years. With Maximo Application Suite (MAS), developers will be able to perform all kinds of customizations (including beans) and there is no need to write any java classes. Though scripts are the way to go in future, it should not always become an obvious choice. One of my earlier Blogs compare’s scripts and java in various aspects which may help you to some extent in taking a decision.

Every automation script consists of launch point, variables, and actual code. Automation scripts can be written at below levels:

  • Mbo, field
  • Integrations
  • Actions
  • Custom Condition
  • Beans (available in MAS)

MBO (Object) Automation Script:

Object level scripts (object launch point) are created when we must perform any business logic, actions, validations etc. when the record/object is initialized/created/updated/deleted. Below screenshot shows various events available on object launch point. I will be explaining these in detail in the future blog.


Field/Attribute Automation Script:

Attribute level scripts are created when we want to trigger an action, initialize field values, make fields required/read only, perform validations etc. as soon as the attribute value is updated. Below screenshot shows various events available on attribute launch point.


Integration Automation Script:

Integration scripts are written for inbound, outbound integrations when we want to do certain validations on some of the fields, change actions on the payload, skip transactions, add/remove fields in the payload request etc. before the data is consumed (in Maximo) or exported (out of Maximo). There are lot of other things that can be done with integration scripts and those will be covered in future blogs.


Action Automation Script:

Maximo has few out of the box actions which comes as a part of Maximo product, and we can also create custom actions using action application. With custom action script, we can perform multiple validations/checks inside the script before triggering an action.

Custom Condition Automation Script:

Like action script, custom condition script can perform validations/checks and return either true or false. Returned value is then used to take appropriate actions. A condition needs to be created in the conditional expression manager and attach this script in the condition as “Class” (Type of condition). Later this condition can be attached to a sig option so that it gets evaluated based on the code written inside the condition script.

Custom condition script can be directly attached to a workflow condition node and depending upon the script output (true/false), workflow will follow the appropriate path.

Bean Automation Script:

Bean classes (app and data bean) are designed more towards handling UI level logic. Till Maximo Application Suite (MAS), scripts were not supporting to handle bean class functionality completely although some basic stuff such as open a dialog, close a dialog are available in 7.6.x version. In MAS, IBM has provided flexibility to call the bean class methods from inside an automation script. Such script names follow a certain format like, for app bean script name should be in the format of APPBEAN.<APPNAME> (APPBEAN.ASSET).

“mxe.script.allowbeanscript” system property needs to be enabled so that script understands that it needs to invoke a bean method. Also, a checkbox, “Allow Invoking Script Functions” needs to be enabled at script level so that the bean method call is accepted and invoked.

For detailed information on bean class support please visit Bean class support. This blog explains new functionalities brought in automation scripts and other areas of Maximo. You may have to register to see the video.

Thanks for reading this blog. Do provide your comments/feedback and don't forget to follow my blog :-)

Friday, February 2, 2024

Maximo Workflows – Basics: Part 2

In this blog we will talk about workflow designer application, nodes that are available to create/update workflows and a few other technical details.

Workflow Designer:

Workflow designer application can be found under System Configuration à Platform Configuration module. This application is used to create new workflows, update existing workflows, delete the workflows etc.

Nodes:

Workflow designer application comes with the following different nodes to create/update the workflows. I have given a short description of each of these nodes but for detailed explanation you can visit IBM Link.


Task Node: Task node is used to create assignments for the users. Assignment can be created by adding a “Role” in the task node properties. There must be at least one role added to the task node. Once an assignment is created, users can see the assignment in their Inbox/Assignment section on the start center and they can take an appropriate action from there.

Condition Node: Condition node is used to check for conditions (such as siteid==”ABS”, amount>1000$ etc.) and according to the output of the condition (true/false), workflow can be routed to different nodes. As an example, If the PR amount is 100$, send the approval to immediate supervisor. If the amount is more than 100$ send it to the Manager of the immediate supervisor.

Input Node: Also called manual input node, is used to display multiple options to the user on the screen to take an action. Example, options such as Approve, Reject, Close. The user will select one of these options and the workflow will act accordingly.

Subprocess Node: As mentioned in my first blog, subprocess node is used to add another workflow process inside the main workflow.  An organization may have different units following different approval processes. A new workflow can be created in such cases and attached to the subprocess node inside the main workflow. Also, in cases if the main workflow is getting too complex/unreadable, we can create subprocesses by splitting the main workflow logically so that overall workflow would become modular and easy to change.

Wait Node: Wait nodes are used to halt the workflow and not to proceed ahead unless an event is completed. For example, you want your PR workflow not to move forward unless PR is APPROVED. In such scenarios workflow will stay at wait node until PR is APPROVED. Real world example would be, PR is created in DRAFT in Maximo and it is sent to an external system say Oracle for approval. Till the time approval is received, PR workflow will stop at wait node. As soon as approval is received, PR status will change to APPROVED and the workflow will automatically move from wait to node to the next node.

Interaction Node: Interaction nodes are used to perform certain actions while the workflow is in progress. For example, display a message on the UI, trigger another workflow, switch to a specific tab of the application, trigger actions (available under select action and toolbar), switch to another application from current application etc.

Stop Node: Final node in the workflow where the process is stopped.

Start Node: First node in the workflow. You can have ONLY ONE start node in any workflow but can have multiple stop nodes and other nodes.

Create/Update Workflow:

Business requirements do change every now and then. There comes a need to create a new or update the existing workflow to accommodate these change requests. With workflow designer application it is very simple to create a new version or update an existing one. Below steps can be followed to create/update the workflow in Maximo.

  • To create a new workflow, click on the plus icon at the top. Also, there is an option “New Process” under Common Actions to create a new workflow.
  • Go to Canvas tab where you will see all the nodes available in the workflow. Start and stop nodes are added by default.
  • Just drag and drop the nodes on the canvas. These nodes are connected by either positive lines or negative lines. Positive lines are added by pressing right click and dragging the line to the target node and negative lines can be added by pressing shift and right click.
  • You can add the properties of all the nodes as mentioned in the IBM Link
  • Once all the nodes are added, click on Validate Process, Enable Process, Activate Process sequentially so that workflow can be activated.
  • If you are adding a sub process in the workflow then that sub process needs to be validated and enabled ONLY and need not be activated.
  • post-production if a need arises to make changes in existing workflow, you can do it very easily with the help of “Create Process Revision” option under Common Actions. A new version of the existing workflow will be created, and you can make changes as per your business requirements. Once the changes are completed, you can again validate, enable, and activate the latest revision so that the new version takes effect going forward for all the newly created records.

Resync:

Sub processes are part of the main workflow. When a sub process is modified, we need to make sure that the main workflow knows and accepts the new version of the sub process. For this, the new sub process needs to be synched with the main workflow. In workflow designer under More Actions, an option “Resynchronize an Active Workflow” is available to resync the latest sub process with the main workflow.

Auto-Initiate:

Workflows can be triggered/routed manually or also automatically. To route the workflow automatically there is an option called “Set Process to Auto-Initiate” under More Actions. Once this is selected, as soon as the record is saved for the first time, workflow is triggered. There are other options as well to trigger the workflow automatically such as creating escalations, actions etc. but they are not recommended.


Maximo Integration: Design Considerations

IBM Maximo Integration Framework (MIF) is a very powerful tool included as a part of Maximo product which helps in data exchange between Max...